Activity Life Cycle
The Activity Life Cycle is a critical concept to understand when designing any Android application, especially those with multiple activities. When you change activities, switch between apps, or even when the system decides to crash, your app and its Views can be stored in memory with little notice. You must understand how the Life Cycle works in order to make your app react appropriately to these events.
Objectives
- Describe the basic components to the activity life cycle
- Implement the Activity lifecycle methods
- Implement saving state on rotation using Bundles
- Describe the onSaveInstanceState method
Activity Basics
- Applications consist of Activities and Layouts.
- An activity is a instance of the
Activityclass that the Android SDK provides. - Developers write sublcasses of
Activityto implement the functionality that your application requires. - A layout defines a set of user interface objects and their position on the screen.
- A layout is made of elements defined in XML.
- Activities are the Java implementation and management of the Layout you define in XML.
A Basic Activity
The definition of an activity is something that is done for a particular purpose.
Think about the activity that the user is doing on a screen. If you are looking at a screen whose purpose is to log in the user, for example, it should be called the Login Activity. If the activity shows a user's social network profile , it should be called the User Profile Activity.
An activity is a plain ol' Java class. We can create our own activities by creating
a new class that extends from the Activity class.
Our activity here overrides the onCreate method that is called when the Activity
is created and it does two things:
- It calls
super.onCreateand passessavedInstanceStateto it's inherited parent super constructor. This allows the parent class to set up everything as it wants correctly. - It uses
setContentViewto define what layout is associated with this activity.
This is the simplest Activity you can create in Android!
public class MainActivity extends Activity {

    @Override
    protected void onCreate(Bundle savedInstanceState) {
        super.onCreate(savedInstanceState);
        setContentView(R.layout.activity_main);
    }
}
Stages of the Activity Life Cycle
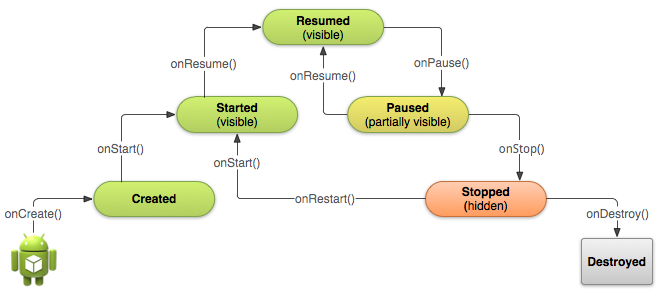
The Activity Life Cycle is split into six distinct states that are triggered in a specific order when your activities are changing. The image below shows the six states and the order they happen in.
 (Image from Android Developer Reference)
Created: This happens after onCreate(), a familiar method by now, is called. At this point, the activity can begin to set up any of the data it needs and can prepare the view for when it is made visible.
Started: At this point, the activity is now visible but cannot be interacted with.
Resumed: When the activity is Resumed, it is fully running and ready to use. It can be interacted with by the user.
Paused: When the activity is paused, it is still visible in the background, but there is another activity covering it. The paused activity cannot be interacted with, and onResume() must be called before interacting with it again.
Stopped: When the activity is stopped, it is completely hidden from the user. This could be another activity within your app, the user returning to the home screen, or even another app being launched.
Destroyed: The activity is released from memory and must be recreated to be used again. Activities can be destroyed by your app or by the system if it needs to reclaim memory.
Method Callbacks in the Life Cycle
While the image above shows the states of the Life Cycle, it doesn't show why the states change. The image below goes into more detail.
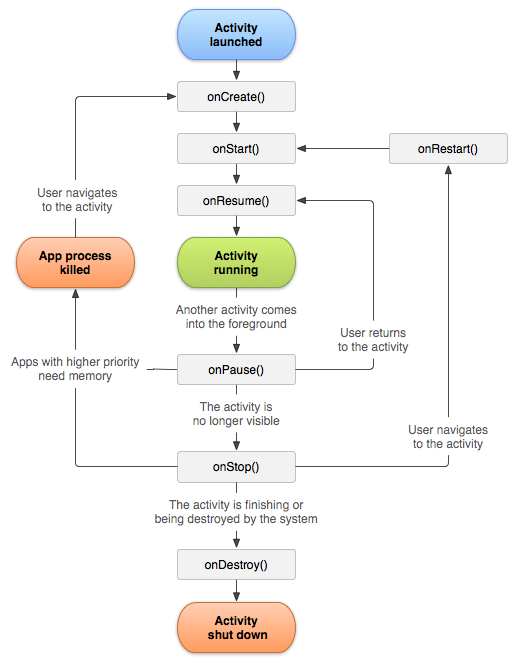
One important thing to notice is that it clarifies when onCreate is called and member variables must be recreated. For instance, the activity is no longer considered visible when you rotate the screen!
onRestart is called when the user navigates back to the previous activity and the app process was not killed.
When combined, the two images above give a very clear picture on what causes these methods we have seen pop up in our apps to be called.
Method Callbacks in the Life Cycle
@Override
protected void onCreate(Bundle savedInstanceState) {
  super.onCreate(savedInstanceState);
  setContentView(R.layout.activity_next);
  Log.d(TAG, "onCreate");
}

@Override
protected void onStart() {
    Log.d(TAG,"onStart");
    super.onStart();
}

@Override
protected void onResume() {
    Log.d(TAG,"onResume");
    super.onResume();
}

@Override
protected void onPause() {
    Log.d(TAG,"onPause");
    super.onPause();
}

@Override
protected void onStop() {
    Log.d(TAG,"onStop");
    super.onStop();
}

@Override
protected void onDestroy() {
    Log.d(TAG,"onDestroy");
    super.onDestroy();
}

@Override
protected void onRestart() {
    Log.d(TAG, "onRestart");
    super.onRestart();
}
Notice what methods are being used:
onCreate
onStart
onResume
onPause
onStop
onDestroy
Introduction: Saving State with Bundles (20 mins)
Now that we've covered when the Life Cycle callback methods are called, we can put them to use! Overriding these methods allows us to save the state of the activity in case it is removed from memory. If this happens, all member variables (ie loaded data, references to UI elements) will be lost.
There are many ways of saving and restoring the state of the activity, but we will be covering using Bundles for this lesson. In the next lesson, we will implement some of the other techniques. Generally, saving and restoring with bundles is used when you want to be able to restore state (also known as current state or state data) when the app is still active, but it is ok if state is lost when the entire app is closed. The opposite of that is persistent state, which uses persistent data. An example of this is data for application preferences.
A bundle is a data structure that allows you to store data by associating a unique key with the data. Two things:
- The key must be a String
- The values stored can be any type of data including, but not limited to: ints, doubles, Strings, ArrayLists, or any custom class
For example, if we were tracking the number of times a button was clicked in a variable called mNumClicks, we could use the following code for storing and retrieving the data:
//storing
exampleBundle.putInt("numberOfClicks",mNumClicks);

//retrieving
mNumClicks = exampleBundle.getInt("numberOfClicks");
To save and restore the current state of the activity, we will be using the onSaveInstanceState and onCreate methods. onSaveInstanceState is called before an activity might be killed, giving you the opportunity to save data.
Saving and restoring data should be used carefully. While it is loading data, the UI is paused and cannot be interacted with. If you are loading massive amounts of data, there will be large pauses in your app.
Guided Practice: Saving State with Bundles and onSaveInstanceState
We will make an app that saves and displays the time the app was launched and restores that value when the activity is destroyed and restarted. To do this, we save the time instance variable in the method onSaveInstanceState, and retrieve it in onCreate.
public class MainActivity extends AppCompatActivity {
    String mTimeStarted;

    @Override
    protected void onCreate(Bundle savedInstanceState) {
        super.onCreate(savedInstanceState);
        setContentView(R.layout.activity_main);

        if(savedInstanceState != null) {
            mTimeStarted = savedInstanceState.getString("timeStarted");
            TextView textView = (TextView)findViewById(R.id.text);
            textView.setText(mTimeStarted);
        } else {
            mTimeStarted = Calendar.getInstance().getTime().toString();
        }
        TextView textView = (TextView)findViewById(R.id.text);
        textView.setText(mTimeStarted);
    }

    @Override
    protected void onSaveInstanceState(Bundle outState) {
        outState.putString("timeStarted",mTimeStarted);
        super.onSaveInstanceState(outState);
    }
}
Independent Practice: Saving State with Bundles
In this practice you will be creating a simple app that has an EditText for your name with a Button to submit it. When you press the button, it prints out the following message in a TextView below "Hello NAME! You will be saved into the bundle! X names have been saved." X is a counter for the number of times the button has been clicked. In the starter code, load the project HelloNameSaveState.
Conclusion
We learned a lot about the Activity Life Cycle during this lesson and now have the ability to save the basic state of the activity. This is very important in production apps because users don't want to have their Views being reset every time they move between activities. In the next lesson, we will continue covering saving data but using persistent storage.